| Поддержка и загрузка |

FAQ (Frequently Asked Questions)
Information Systems
Questions frequently asked to our company and answers to the
questions are described. We hope these will be helpful for you to solve
your issues.
For technical questions that cannot be solved with the following items,
contact here.
About Drivers and application development
Q2: Can the printer status be obtained with Windows Driver?
Q3: Can the blank part at the top be reduced in the printing with Windows Driver?
Q4: Is it possible to use NT4.0/2000/XP driver for Windows2003 server?
Q6: I cannot printfrom MS-Access.
Q7: Why are charactersprinted by CD-S500 driver not clear?
Q8: CT-S280 USB model is not printing correctly after I install the necessary drivers.
Q9: Does your Windows driver work on Windows Embedded?
Q11: How do I open the cash drawer from a ?.Net? application?
Q12: Are Vista drivers available?
Q14: I want to print in Landscape mode (horizontal direction) using the Windows driver.
Q15: Where can I get CUPS drivers?
Q16: Is it possible to get support for Windows CE application development for CMP-10?
Q17: How can I implement the CMP-10 card reader function using my application software?
About communication
Q1: Is USB interface supported?
Q2: Let me know the connection of serial interface.
Q3: Let me know the length of the interface cable.
Q6: Can the status be obtained with parallel interface?
Q7: Let me know the connection of panel printer (CBM-920, CBM-29x) and control board.
Q8: When I connected two identical printers to a PC using USB, the PC hangs up.
Q9: How can I connect CBM29x/CBM920 parallel interface to my PC?
About other functions and specifications
Q1: Let me know the method of setting print density with CT-S300/CT-S280/PPU-700.
Q2: Let me know the method of switching Shift-JIS/JIS with CT-S300/CT-S280/PPU-700.
Q3: Let me know the connection of power cord for CBM-920II.
Q4: How much is the tolerance of mounting angle of CBM-29x?
Q7: Is it possible to disable the auto power off function of CMP-10?
Precautions in printer switching
Case1: Switching from CBM-270 to CT-S280
Case2: Switching from iDP-3110, CBM-910 to CBM-910II
Case3: Switching from CBM-920 to CBM-920II
Case4: Switching from CBM510/520/530?
About printing
Case1: Thin printing
Case2: No printing in red.
Case3: Printing is clogged.
Case4: Dot is missing.
Case5: Print out is dirty.
Case6: Thin printing on 2-ply paper
Case7: No printing
Case8: “Power Down (Data in Buffer)” is printed.
Case9: White line(s) on graphics printing
About communication
Case1: Print out is not correct.
About other operation
Case1: Auto cutter does not operate normally.
Case2: Drawer does not open.
Case3: Excessive implementation of paper feed operation
Case4: Printer power is not turned on.
Case5: Printer prints garbage using serial interface during PC boot up.
Case6: Label sensor adjustment
About treatment at the occurrence of operation failure
When any malfunction occurs, observe the LED indication on the
operation panel. You can know the error content from the pattern of LED indication.
For the relationships between LED indication pattern and error
contents, refer to the user’s manual of the product in use.
Be sure to check for the cause of the error that corresponds to the
error contents you observed. You can download the user’s manual from the download site of user’s manual.
If you cannot solve the issue with the above procedure, be sure to check for any information on the similar malfunction shown below.
Information Systems Q&A
About Drivers and application development
Q1: Is there any Windows Driver conforming to the product purchased or being studied about adoption in the future?A1:For the status of Windows Driver support for product and OS, refer to the download site of each driver.
Q2:Can the printer status be obtained with Windows Driver?A2: Some products are provided with Windows
Driver having status monitor.
For the status of product support, refer to the download
site of each driver.
A3: In the printing with Windows Driver, paper
is fed automatically to the cut position after printing.
As this paper feed inserts a blank corresponding to the space between
cut position and print start position at the top position of printing,
this blank part at the top of printing cannot be reduced in the
printing with Windows Driver.
A4: Yes. It is possible to use the driver by
changing the setting.
Windows2003 server accepts User mode driver only as default and refuses
the Kernel mode driver which can be used on NT4.0/2000/XP. If you
change this setting, you can use NT4.0/2000/XP driver on Windows2003
Server. The method to change the setting is HERE.
A5: Please refer to the explanation about
terminal service and printing from Microsoft
http://download.microsoft.com/download/4/6/b/46bae314-ea7b-4c39-bcb6-defbc907ee54/TSPrint.doc
and follow the explanation.
If it still does not solve the problem and if you want to cut the paper
at the end of printing, you can add cut function in the following steps.
Find GPD file such as CBM1000II.GPD in 1.xx driver files.
Open the GPD file by the editor, NotePad for example, and you can find
followings around the 300th line.
*Command: CmdEndJob
{
*Order: JOB_FINISH.0
*Cmd: "<000000>"
}
Change the above "<000000>" to "<1D>V<01><00>".
("<1D>V<01><00>" is partial cut command.)
Then you can have partial cut at the end of printing.
It is also recommended to change version in *GPDFileVersion: "1.xx" of
the 3rd line.
A6: MS-Access does not allow longer paper size than 57.78cm (22.75inch). Therefore the default paper size of our printer (3276mm) cannot be used with MS-Access. Please choose shorter paper size as A4 length.
Q7: Why are characters printed by CD-S500 driver not clear?A7: Those characters should be printed in graphics. CD-S500 is dot matrix printer and its resolution is not high. Therefore the characters printed in graphics are not clear. If you want to print good looking characters, please use printer font on the application software or set the graphic mode of driver to Standard or High quality mode. Refer to the driver guide which comes with Windows driver. If you use Standard mode or High quality mode, printing is slower than draft mode (default).
Q8: CT-S280 USB model is not printing correctly after I install the necessary drivers.A8: It may be the wrong baud rate setting for the virtual COM port or the driver is not correctly installed. If the correct baud rate (115200bps) does not solve the problem, it is recommended to remove the driver and re-install it once again. To uninstall the virtual COM driver, execute the uninstaller (FTDIUNIN.exe) which is included in the folder of V-COM driver.
Q9: Does your Windows driver work on Windows Embedded?A9:: Yes, there is no difference between Windows Embedded and Windows.
Therefore, if the necessary components or files are included in Windows Embedded the Windows driver should work without any problems. However, many Windows Embedded systems do not have all the components or files loaded on the system.
This is the most common cause of the driver not working. In this case, please consult with the machine manufacturer.
The necessary components for Windows driver are as follows:
?System Restore Core
?Error Reporting
?Communication Port
?Local Printing Support
A10: It seems that if the re-directed driver from the client is used from the application, it causes the problem.
If you make the driver on the client to be shared and use the shared driver on the server, the problem should be solved.
This problem will not happen with next version driver.
A11: Using the special printer font function of the driver to open the cash drawer on a ?.Net? application will not work because the printer font is not supported by ?.Net Framework?. Instead, use the printer driver function to automatically open the cash drawer. The details of this function are detailed in the driver manual.
Q12: Are Vista drivers available?A12: The first driver listed in the download page for POS printer driver supports Vista currently.
English version
Chinese version
The driver for PD22/24 supports Vista as well.
Drivers for barcode printers support Vista also.
A13: Please adjust the paper size in the driver properties.
How to Create Custom Forms in Windows
(These sites are for Windows NT or 2000 but they are also applicable for XP and Vista.)
A14: Select Landscape orientation is available.
If you are developing an application for Landscape printing, please program like following example.
Example for VB6
??Printer.Orientation = vbPRORLandscape ? 'Horizontal direction
??Printer.Orientation = vbPRORPortrait ??'Vertical direction(Normal)
A15: We can supply CUPS drivers based on your request.
Please note: although our web site gives instructions for downloading CUPS driver basic knowledge for Linux and CUPS is required.
A16: We supply a SDK (Software Development Kit). It includes sample programs for five development languages
(AppForge, Compact.NetFrame C#, Compact.NetFrame VB, EmbeddedVB, EmbeddedVC) to work with CE drivers.
It is worth noting, since the mobile device handles IrDA and Bluetooth as a COM port, many customers made have written their own applications to communicate to the printer directly using a COM port.
This illuminated the need for a CE driver.
A17: The SDK includes card reader functionality in Qx. For other application development issues, please refer to Qx.
About communication
Q1: Is USB interface supported?A1: The status of supporting USB interface
depends on the product.
Refer to the product information
site for the interface specifications of the product you are
studying about adoption.
If the interface specifications include a “USB” description, the
product complies with the USB interface.
A2: Refer to the host-to-printer interface
specification of the user’s manual for the connection of serial
interface cable.
A typical example of connection is shown below.
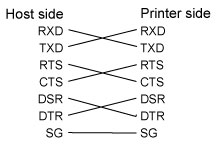
Though the product has been verified that it can operate with a cross cable (reverse cable) generally sold in the market, do not use a cable with unusual connection.
Q3: Let me know the length of the interface cable.A3: For serial interface, the cable length is
specified as 15 m maximum in the RS-232C standard.
For parallel interface, the cable length is specified as 10 m in the
IEEE1284 standard. However, the longer the interface cable, the more
sensitive to external noise, resulting in the cause of communication
failure.
It is recommended that the interface cable be as short as possible.
If a longer interface cable must be used by any means, make a study of
noise prevention in accordance with the environment of use.
A4: There is no product that can comply with RS-422/485 among the products handled by our company.
Q5: Can current loop be used?A5: There is no product that can comply with current loop among the products handled by our company.
Q6: Can the status be obtained with parallel interface?A6: The support status varies with the product. Refer to the product
information site for the interface of the product you are studying about the adoption.
As the product having a description of parallel interface specification (IEEE1284 compliant) supports bidirectional communication, acquiring
the status is possible.
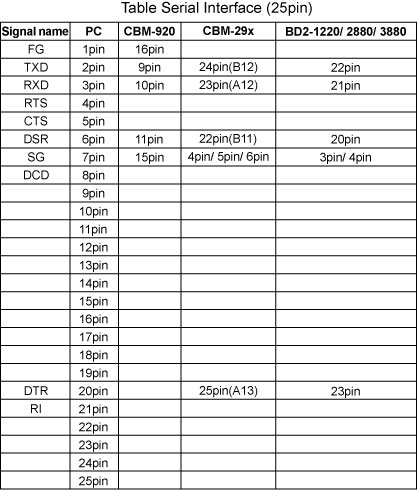
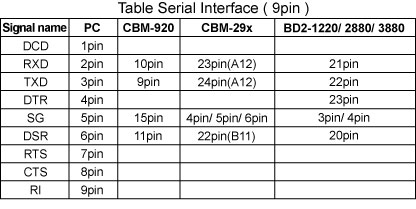
A7: Refer to the following description on the connection of interface.
For other wiring (such as power supply), refer to the user’s manual of the product you purchased.

A8: The USB interface has a default serial number of "00000000" for many printer models (CT-S2000/CT-S2010/CT-S4000/CT-S310). Because of this, the PC cannot distinguish a difference between the two USB printers causing the PC to hang. To fix this, USB serial numbers need to be individually set for each printer if you want to connect more than 2 CT-S printers to a PC.
With unique USB serial numbers, Windows driver installation is required for each printer.
How to change the USB serial number
Please use the Printer Customization software. The software can be downloaded from our site.
Japanese version (No.6 is the software)
English version (No.6 is the software)
The function to change USB serial number is located from Menu
File=>USB Serial No Regist
A9: Please refer to the file showing the recommended wiring.
About other functions and specifications
Q1: Let me know the method of setting print density with CT-S300/CT-S280/PPU-700.A1: As a method of setting print density,
printer function setting command is available. For details of the
command, refer to Command Reference.
Command Reference can be downloaded from the download
site of command reference.
In addition, a tool for customizing printer function like print density
(Printer Customization) is provided.
This customization tool can be downloaded from the download
site of utility software.
* No. 6 in the download site corresponds to the relevant tool.
A2: Methods with Kanji control command and printer
customize command are provided. For details of command, refer to
Command Reference.
Command Reference can be downloaded from the download
site of command reference.
A tool for customizing the printer function such as Shift-JIS/JIS
switching (Printer Customization) is also provided.
This customization tool can be downloaded from the download
site of utility software.
* No. 6 in the download site corresponds to the relevant tool.
A3: Considerable amount of current flows in the
power cord during printing operation in accordance with the
specification of the product.
As the method of connection for power cord may cause voltage drop in
the power cord, it is thought that printer operation may fail due to
unstable voltage applied to the printer.
To keep the voltage applied to the printer stable, the following three
points must be considered on the connection of power cord.
(1) Power cord connection
The longer the power cord connection, the more the effect of the
voltage drop in the power cord, resulting in negligible effect.
Be sure not to let power cord connection be excessively long.
(2) Separated wiring
Avoid the wiring with +5V and GND for driving and control lines
gathered to +5V and GND respectively up to the power supply.
Wire +5V and GND for driving and control lines separated from each
other up to the power supply.
(3) Power cord wiring material
In order to reduce the effect of voltage drop in the power cord, use
the wiring material with thick core diameter and smaller conductor
resistance (AWG20 or AWG18).
A4: Angle of elevation 10°/angle of depression 5° is a rough target for the standard of vertical surface.
Q5: When I tried to connect PDA to CMP-10BT via Bluetooth, I was required to enter PIN code. What should I enter as the PIN code?A5:There are two different ways depending on
Bluetooth module that you are using.
(Old type Bluetooth module) If its serial number is
smaller than 0640001 or self print shows firmware version 1.xx, enter
the last 4 digits of "Address" in numbers or lower case characters.
Example Address: 00 0A D2 10 1F FD => PIN code "1ffd"
(New type Bluetooth module) If the serial number is
larger than 0640001 or self print shows firmware version 2.xx, enter
the last 4 digits of "Address" in numbers or upper case characters.
Example Address: 00 01 90 E1 A2 CF => PIN code "A2CF"
With new type Bluetooth module, you may be required to enter PIN code
every time when you connect from PDA to the printer.
This is because CMP-10BT does not save the information of connected
Bluetooth module.
To change the setting to save the connected Bluetooth module
information (Pairing Information), please refer HERE.
A6: Because the print speed of CT-S2000 is fast, it is expected to use high sensitivity paper for CT-S2000.If you use standard paper, we recommend to set CT-S2000 to high quality printing mode. To set CT-S2000 to the high quality printing mode, memory switch MSW5-6 should be ON. Maximum printing speed in high quality printing mode is same as standard mode.
Precautions in printer switching
Case1: Switching from CBM-270 to CT-S280•The distance from print start position to manual cutter
position is different.
If the print data created for CBM-270 is directly printed with CT-S280,
the margin at the top of printing is narrowed and the margin at the
bottom is widened.
<Reference> Distance from print start position to manual cutter
position: Approx. 13.5 mm for CBM-270 and approx. 8.4 mm for CT-S280.
•Communication speed of 1200 bps is not supported.
Communication speed of 1200 bps supported by CBM-270 is not supported
with CT-S280.
If your printer is currently used with communication speed of 1200 bps,
communication speed must be changed at the host.
•Method of printing barcode Code128 is different.
Though setting of each function is carried out by means of the DIP
switch or solder jumper with CBM-270, setting each function is made by
means of the DIP switch, memory switch, or customize value with
CT-S280. If you are printing Code128 with CBM-270, the print control
portion of Code128 with your software must be changed.
•Method of setting each function is different.
Though setting of each function is carried out by means of the DIP
switch or solder jumper with CBM-270, setting each function is made by
means of the DIP switch, memory switch, or customize value with CT-S280.
Even if the DIP switch setting for CT-S280 is made to the same as that
for CBM-270, no identical operation occurs. Perform the setting
suitable for your use by referencing the user’s manual.
For the setting of memory switch and customize value, customize tool is
provided for your use.
Customize tool can be downloaded from the download
site of utility software.
* No. 6 in the download site corresponds to the relevant tool.
•The method of setting each function is different.
Though setting of each function is carried out by means of the DIP
switch with iDP-3110 and CBM-910, setting each function is made by
means of the DIP switch or memory switch with CBM-910II.
Even if the DIP switch setting for CBM-910II is made to the same as
that for iDP-3110 or CBM-910, no identical operation occurs. Perform
the setting suitable for your use by referencing the user’s manual.
•The function of paper-near-end detection is added.
With the switching from iDP-3110, the function of paper-near-end
detection is added.
The function of paper-near-end detection allows the printer to stop
printing when the remainder of paper becomes low.
This function can be disabled by the memory switch. Use this function
by changing the setting depending on your use.
•The method of setting each function is different.
Though setting of each function is carried out by means of the DIP
switch with CBM-920, setting each function is made by means of the DIP
switch or memory switch with CBM-920II.
Even if the DIP switch setting for CBM-920II is made to the same as
that for CBM-920, no identical operation occurs. Perform the setting
suitable for your use by referencing the user’s manual.
•If you choose CD-S500 and change the setting, you can replace the printer without changing paper width, number of columns etc.
•If you choose IDP3550, paper width is changed but you can replace without changing the setting of the printer.
(This answer does not consider any physical size compatibility issues.)
About treatment at the occurrence of operation failure
When any malfunction occurs, observe the LED indication on the
operation panel. You can know the error content from the pattern of LED
indication.
For the relationships between LED indication pattern and error
contents, refer to the user’s manual of the product in use.
Be sure to check for the cause of the error that corresponds to the
error contents you observed. You can download the user’s manual from the download site
of user’s manual.
If you cannot solve the issue with the above procedure, be sure to
check for any information on the similar malfunction shown below.
•About printing
Case1: Thin printing<If you are using an impact dot printer>
•The ink ribbon set on your printer is worn out.
Verify the state of wear of the ink ribbon. If the ink ribbon is worn
out, replace the ink ribbon and try printing.
•Ink ribbon is not set correctly.
Verify the state of setting the ink ribbon. If not correct, set the ink
ribbon correctly and try printing.
<If you are using a thermal printer>
•The printer cover is not closed correctly or the head up lever is not returned to the correct position.
Confirm that the printer cover is closed correctly and the head up lever position is correct.
If not correct, close the printer cover correctly or return the head up lever to the correct position and then try printing.
•The paper is different from that recommended by our company.
As it is thought that initial print density setting may not exhibit correct color, change the print density by referencing the user’s
manual, etc.
<If you are using an impact dot printer>
•The ink ribbon is not set correctly.
Verify the state of setting the ink ribbon. If not set correctly, set the ink ribbon correctly and try printing.
•The ink ribbon is a mono-color ribbon.
Check the ink ribbon in use. If you want to make 2-color printing, use the ribbon for 2-color printing.
<If you are using a thermal printer>
•The paper is mono-color thermal paper.
Check the specifications of the paper. If you want to make 2-color printing, use the paper for 2-color printing.
•The printer setting is not sufficient.
Verify the state of setting the printer such as memory switch and customize value. Retry setting and printing.
•As paper is not set to the paper holder correctly, overload is applied to the paper feeding.
Check the state of setting paper to the paper holder. If not correct, set paper correctly and try printing.
<If you are using an impact dot printer>
•The ink ribbon is not set correctly.
Verify the state of setting the ink ribbon. If not set correctly, set the ink ribbon correctly and try printing.
•Life and failure of printer head
Verify whether the dot missing is on specific line.
If the dot missing is specific line, life or failure of printer head is assumed. Ask the agent you purchased your printer for repair.
<If you are using a thermal printer>
•Dirt or foreign object on thermal head
Check for paper dust or foreign object on the thermal head.
If dirt or foreign object is present, try cleaning of thermal head by referencing the user’s manual.
•Disconnection of heating element of thermal head
Check for a scratch that might cause disconnection of the heating element of the thermal head
If any scratch that might cause disconnection of heating element is present, replacement of thermal head is required. Ask the agent you
purchased the product for repair.
•Ink ribbon is not set correctly.
Verify whether the ink ribbon is set in the correct position. If not, retry setting the ink ribbon correctly.
•Printer setting is not correct.
A function of paper type switching (1PLY⇔2PLY) may be provided for DIP switch depending on the product in use.
Refer to the user’s manual of your product for the presence of the above function with DIP switch. If present, try using it after setting.
<If you are using an impact dot printer>
•Ink ribbon is twisted or locked or it is not set correctly.
Verify the status of the ink ribbon. Restore the ink ribbon to the normal state or replace the ink ribbon and try printing.
•Paper is not set correctly.
If paper is not set correctly, no-paper is detected and no printing occurs.
Verify the paper setting status. If not set properly, set it correctly and try printing.
<If you are using a thermal printer>
•Paper is set reversely, thermal paper is not set, or paper is not set correctly.
Verify the status of setting paper and paper type. Set thermal paper correctly and try printing.
•Data is present in the input buffer at power ON.
Some products have a backup function for input buffer.
When printer power is turned off due to power interruption during printing, "Power Down (Data in Buffer)" is printed before resuming
printing after printer power is turned on.
When printing at power on, try data removal in the print buffer in accordance with the procedure shown in the user’s manual.
•Effect of intermittent printing
While graphics printing (including TrueType font printing using Windows Driver) is in operation, printing may be suspended due to communication
speed if data for printing the next line is not sufficient till the printing of the current line is finished. When print data for the next
line becomes sufficient, printing is resumed (resulting in herky-jerky operation).
Memory switch is assigned a buffering function depending on the product. This function allows printing after a specified amount of
print data is supplied. Though it takes a little longer time from the
transmission of data till the start of printing, intermittent printing can be regulated and white line(s) in graphics may be avoided.
Refer to the user’s manual of the product in use and if the above function is available, set it to enable and try printing.
•About communication
Case1: Print out is not correct.•Condition for serial communication differs between the host and the printer.
Verify the condition of communication between the host and the printer.
Adjust the condition for communication between the host and the printer and try printing.
•Erroneous wiring of signal line for communication
Verify whether the wiring of signal line for communication is correct. If the wiring is erroneous, correct it and try printing.
•Print data received by the printer is not correct.
Data received by the printer may be different from the desired one due to communication timing or external noise.
Some products have the function of hexadecimal dump printing (function to print the data received by the printer in hexadecimal code).
Check the data received by the printer by using a line monitor or hexadecimal dump printing feature.
For the presence of absence of hexadecimal dump printing feature or method of using hexadecimal dump feature, refer to the user’s manual of the product in use.
The output timing of ACK and the release timing of BUSY may be changed by the memory switch depending on the product.
Change the output timing of ACK and the release timing of BUSY and try printing.
If interface cable is longer than necessary, take countermeasures to prevent the effect of noise and try printing.
Use twisted pair line for the material of interface cable as an example of countermeasure.
•About other operation
Case1: Auto cutter does not operate normally.•Cutter function is disabled by the DIP switch or memory
switch.
Verify the setting of DIP switch and memory switch. Enable the cutter function and try printing.
•Windows Driver in use has no cutter function or cutter
function is disabled by the setting of Windows Driver function.
Verify Windows Driver in use and the status of its function setting. Install Windows Driver with cutter function or enable the cutter
function with the function setting and try printing.
•Control code transmitted from the created software to the printer is not correct.
Verify the control code transmitted for driving auto cutter and the control code received by the printer.
Verify the control code received by the printer using a line monitor or hexadecimal dump printing feature.
If there is any error in the control code transmitted, correct the control code to be transmitted and try printing.
•Drawer is not connected firmly.
Verify the status of connecting the drawer. Connect the drawer correctly and try printing.
•The wiring and specification of the drawer being connected is not correct.
Verify that the wiring and specifications of the drawer in use comply with the specifications described in the user’s manual of the product
of our company.
•The control code transmitted from the created software to the printer is not correct.
Verify the control code being transmitted to open the drawer and the control code received by the printer.
Verify the control code received by the printer by using a line monitor or hexadecimal dump printing feature.
If there is any error in the control code being transmitted, correct the control code to be transmitted and try printing.
•CR code is enabled by the setting of printer function.
Verify the current setting of CR code with the DIP switch and memory switch. If CR code is set to be effective,
receiving a CR code with data present in the print buffer causes printing and line feed operations.
Therefore, if CR+LF code is transmitted for printing and line feeding from the software created or being used, a line feed of two lines occurs.
Disable the CR code by the setting for CR code with the DIP switch and memory switch and try printing.
• Power code is not connected firmly.
Verify the status of connecting the power code. Connect the power code and try printing.
•RESET signal is input through the interface.
Remove the interface cable from the printer and verify whether the phenomenon can be avoided.
Enable/disable of RESET signal from the interface may be switched with the DIP switch or memory switch depending on the product.
Referring to the user’s manual of the product in use, change the setting and try printing.
If RESET signal switching feature is not available, study the disconnection of RESET signal between the host and the printer.
•Printer failure
Failure in the printer is assumed. Ask the agent you purchased the product for repair.
Q:During PC boot up, Printer using serial interface prints garbage characters.
A: Few PCs have this problem. Unfortunately, there is no solution for the issue.
Case6: Label sensor adjustmentQ:Label printer is not printing at correct position, print position is not consistent, or printer skips blank labels.
A: Please adjust the label sensor sensitivity.
Please refer to the user?s manual of each printer for the details to adjust the sensor.
- Digital Photo Printer
- POS PRINTERS
- PANEL PRINTERS
- BARCODE LABEL PRINTERS
- KIOSK PRINTERS
- MOBILE PRINTERS
- PRINTER MECHANISMS
- EP SERIES PRINTER MECHANISMS
- POS PRINTERS
- PANEL PRINTER
- PRINTER MECHANISMS
- FAQ (Frequently Asked Questions)
- Drivers
- Utility Softwares
- User's Manual
- Command Reference
- Product Catalogue
- Product Brochure
- Technical Support
- General Information
![]()
![]()
![]()

- You need Adobe® Reader to see and print out PDF files. Please click this button and download free Adobe® Reader.